
Bike Pumps
Lightweight & Compact Mini Bike Pumps Built for On-the-Go Rides
Grab a bike pump that matches your valve type and get back on the road today. Xchange Sports stocks portable dual-head pumps that fit both presta and schrader valves, on road bikes, mountain bikes, BMX and kids’ bikes.
A presta valve is narrow with a small locknut at the tip. A schrader valve is wider and matches a car tyre. A dual-head pump fits both without an adaptor.
✓ Flat Rate Shipping Australia-Wide • ✓ 30-Day Love Your Ride Guarantee • ✓ Australian Family-Owned Business • ✓ Secure Payments & Checkout

Trusted and Loved by Hundreds of Happy Parents and Grandparents!
Showing the single result
Frequently Asked Questions of Bike Pump
Remove the valve cap, unscrew a Presta locknut if applicable, and attach the pump chuck securely. Pump with long, full strokes to the target PSI marked on the tyre sidewall. Remove the chuck cleanly, tighten the Presta locknut if applicable, and replace the cap. Check pressure before each ride.
A dual-valve floor pump with a pressure gauge is the best bicycle pump for regular home use on kids bikes. Kids bikes typically use Schrader valves. A floor pump inflates tyres efficiently and accurately. Supplement it with a small portable bicycle pump for rides away from home.
A portable bicycle pump is a compact, lightweight pump for roadside tyre inflation. It fits in a bag, jersey pocket, or mounts to the bike frame. It is not a replacement for a floor pump — it is a backup for flats that happen away from home.
Most quality bicycle pumps fit both Presta and Schrader valves. Presta valves are narrow with a threaded locknut, found on road and higher-end bikes. Schrader valves are wider, identical to car tyre valves, found on most kids bikes and MTBs. Always check valve compatibility before purchasing.
The correct PSI is printed on the tyre sidewall as a minimum and maximum range. Most kids bike tyres inflate to 35–60 PSI depending on tyre width and terrain. Wider tyres run lower pressure. Under-inflated tyres increase rolling resistance and the risk of pinch flats.
No. A small bicycle pump is a portable emergency tool only. Using it as a primary pump is slow and physically demanding. For regular tyre inflation at home, a floor pump with a pressure gauge inflates tyres faster, more accurately, and with far less effort.
No, not with a dual-head pump. French valve is simply another name for presta, and a dual head fits it directly. You would only need a brass adaptor to use a schrader-only pump, such as a service-station air hose, on a presta valve.
A dual-head pump. It fits presta and schrader valves in the same unit, so one pump covers a parent's road bike and a child's kids' bike without swapping parts or hunting for an adaptor. Households with mixed bikes almost always end up here.
Looking For Adventure and Insider Tips?
Here you’ll find tons of ideas and inspiration to make bike riding or skating with your child, even more fun!




Why Choose Our Quality Products For Your Child?
Which Bike Pump Suits Your Bike?
The best bike pump depends on your tyre valve, where you plan to use the pump and how much space you have available.
A bike floor pump is designed for convenient inflation at home. A portable mini pump is compact enough to carry in a backpack, riding bag or family cycling kit.
Presta or schrader — check your valve before you buy
Most road bikes and newer mountain bikes use a narrow presta valve. Most kids’ bikes, BMX bikes, and older hybrids use a wider schrader valve. Schrader is the same style found on car tyres.
Before buying, identify whether your bike uses a Presta or Schrader valve and check that the pump supports the pressure range specified by the tyre manufacturer.
| Presta valve | Schrader valve | |
| Also called | French valve, thin valve | American valve, car valve |
| Width | Narrow, about 6mm | Wider, about 8mm |
| Tip | Small locknut you unscrew first | No locknut, spring-loaded pin inside |
| Usually found on | Road bikes, higher-end mountain bikes | Kids’ bikes, balance bikes, BMX, older hybrids |
| Pump head needed | Presta head or dual head | Schrader head or dual head |
| Adaptor needed? | Only if your pump is schrader-only | Only if your pump is presta-only |
| How to spot it | Thin stem, threaded along its length | Chunky stem, matches your car tyre |
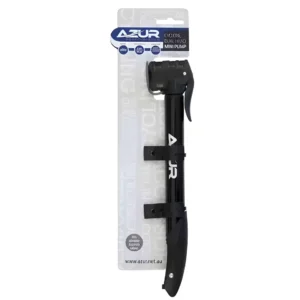
The Azur Mini Bike Pump handles both valve types in one unit. Its dual head switches between presta and schrader without extra parts or adaptors. That makes it a solid pick for households running more than one bike type.
Check the top of the valve stem if you are unsure which one you have. Presta valves show a small locknut near the tip. Schrader valves do not have one and look chunkier overall.
Do you need a presta adaptor?
A dual-head pump needs no adaptor at all. You only need a brass presta adaptor if your pump has a schrader-only head, which is common on service-station and car pumps. The adaptor screws onto the presta stem and converts it to a schrader fitting.
Keep one in the saddle bag as a backup. It costs little, weighs nothing, and turns any car pump into a workable option on a long ride.
Bike Pump Comparison
| Pump Type | Best Use |
|---|---|
| Floor pump | Regular home inflation, family bike maintenance and easier pressure checks when the pump includes a gauge. |
| Mini pump | Portable inflation, emergency top-ups and carrying on family rides or weekend trips. |
| Dual-valve pump | Households with a mixture of Presta and Schrader valves across children’s and adult bikes. |
Floor Pumps vs Portable Bike Pumps
A floor pump uses a larger barrel, stable base and long handle to move more air with each stroke. It is the convenient choice for regular tyre-pressure checks at home.
A portable bike pump trades inflation speed for compact size. It is designed to travel with you and help reinflate a compatible tyre away from home.
Many families keep a floor pump in the garage and a mini pump in the car, backpack or riding kit.
A built-in gauge is the difference between guessing and knowing. Without one you cannot tell 30 PSI from 50 PSI by feel, and both under and over-inflation cost you grip. Look for a dial marked in clear increments rather than a printed strip.
How to Use a Bike Pump
- Check the recommended pressure marked on the tyre or provided by the tyre or bicycle manufacturer.
- Remove the valve cap. If using a Presta valve, loosen the small threaded tip.
- Select the correct pump head or valve setting.
- Push the pump head straight onto the valve and lock it according to the pump instructions.
- Pump steadily and monitor the pressure with a suitable gauge.
- Unlock and remove the pump head carefully, then close the Presta tip if applicable and replace the valve cap.
Use the Correct Bike Tyre Pressure
Correct tyre pressure supports predictable handling, rolling performance and tyre life. A tyre that is noticeably soft can make a bike feel harder to ride and may be more vulnerable to damage.
There is no single PSI that suits every kids bike, balance bike, road bike or mountain bike. Tyre size, tyre construction, rider weight and riding surface can all affect the appropriate pressure.
Start with the pressure information printed on the tyre and follow the bicycle or tyre manufacturer’s instructions. Never exceed the stated maximum pressure.
How Often Should You Check Bike Tyre Pressure?
Check the tyres before important rides and regularly when the bike is used throughout the week. A quick squeeze can reveal a very soft tyre, but a pressure gauge gives a more accurate reading.
Inspect the tyre if it repeatedly loses pressure. A recurring soft tyre may indicate a puncture, leaking valve or another maintenance issue.
Balance bikes and scooters only require inflation checks when they use pneumatic air tyres. Solid or foam-filled tyres do not need a bike pump.
What to Look for in a Well-Built Bike Pump
- Valve compatibility: confirm that the pump fits Presta, Schrader or both.
- Pressure capability: check that it supports the pressure required by your tyres.
- Secure pump head: look for a head that attaches firmly without damaging the valve.
- Readable gauge: useful for accurate home inflation when included.
- Stable base and comfortable handle: important when choosing a floor pump.
- Portable size and weight: important when the pump will travel in a backpack, car or riding kit.
Bike Pump Shipping and Delivery
Xchange Sports Australia dispatches in-stock orders from its Sydney warehouse within two business days. Carrier transit time begins after dispatch and varies by destination.
Review current delivery charges, estimated transit times and tracking information in our Shipping & Delivery Policy.
Complete Your Family Bike Maintenance Kit
A reliable bike pump is an essential part of keeping a family bike ready to ride. Check tyre pressure regularly and inspect the tyre, valve and wheel whenever pressure continues to drop.
Explore our bike accessories, bicycle spare part and kids bike helmets to complete your child’s riding setup.
Xchange Sports Australia stocks compact bicycle pumps for kids bikes, balance bikes and family cycling. Choose the right valve compatibility and keep every pneumatic tyre ready for the next ride.